| Personal Minutes Supervisor Version 1.2 Copyright © 1997 Wendy Stevenson All Rights Reserved |
 |
- Introduction
- Starting Out
- Installation
- Using PMS
- The Start Button
- The Stop Button
- Editing the Project List
- The Report Button
- The Minimize Button
- The Info Button
- Notes on Exporting Data
- Other Notes
- Disclaimer and License
Introduction
Personal Minutes Supervisor is an application that allows you to keep track of time you spend on projects almost without you thinking about it.
Features:
- easy "tap to start"/" tap to stop" functionality
- easy to edit project data
- view summaries either on a per-day, per-month or per-project basis
- export data in a "timesheet" type format or a simple list format to a Macintosh or Windows desktop machine, for easy inclusion in a spreadsheet, or for printing.
PMS is supplied as a 30- day expiring demo. You can register your version for $25 US either by sending a cheque or money order to:
Burr Oak Software
P. O. Box 1700
Oxford Station, Ontario
CANADA K0G 1T0You may also register using Newton Register which is included in the distribution of PMS, or via our web page, at:
http://www.burroak.on.ca
If you are registering via regular mail, or via the web, please make sure that you have enclosed both your email address, and your user name as it was entered on your Newton. On 1.3 Newtons, you can find your user name in Prefs-> Personal. On 2.0 Newtons, you can find your user name in Owner Info (in the extras drawer, filed under Setup)-> Owner.
Once you register, you will be given a registration code which will unlock your version of PMS.
Starting Out
Installation
Because PMS consists of both a Newton package and an application for your desktop system, there are two steps to installation:
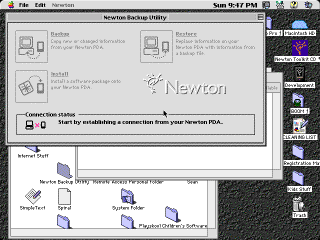
Step 1 - Install the Newton Package
If you have a Newton using Newton 2.0 or Newton 2.1 (MessagePad 120, 130 or 2000), use the Newton Backup Utility (above) or Newton Connection Utility to install pms.pkg. If you have a Newton using Newton 1.3 (MessagePad 100, 110 or 120), use the Newton Package Installer.
Step 2 - Installing the Desktop Client
Desktop client installation is dependent upon whether your desktop system is a Macintosh or Windows based machine.
For Macintosh
There are two items in the PMS distribution folder that you need to be concerned with for the desktop client:
- PMS Mac
- This is the application itself. You can leave this in the distribution folder if you wish, or move it to another location of your choice.
- Put in system folder
- This is a folder that contains two Apple extensions. You should drag these extensions to your System folder. If they already exist in your system folder, you'll receive a confirmation box when you drag them asking you if you want to overwrite; in this case, you should cancel the operation, since the files are already installed.
For Windows
All of the libraries necessary to run the PMS application (pms.exe) are already contained in the distribution directory, and you do not need to move them. Simply double-clicking on pms.exe will start the application.Using PMS
The typical flow of PMS usage looks like this:
- Add a list of projects that you want to track the time for
- Use the Start/Stop button to start and stop timeing projects as you work on them
- At the end of each reporting period, export your time data to your desktop machine using the PMS desktop client
- On your desktop system, load the PMS data into your spreadsheet, and massage the time information to your liking (and maybe make a graph!)
- Along the way, you may forget to stop a project running, or want to change a time entry for a project, in which case you can edit individual project time entries.
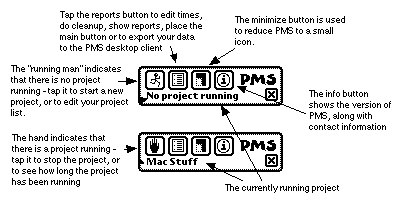
When Personal Minutes Supervisor is started, the main screen appears:
Buttons, from left to right, are the "Start/ Stop", "Reports", "Minimize" and "Info" buttons.
The Start/Stop button is used to start adding time to a particular project, and to stop adding time to a "running" project.
The Start Button
The start button (the button with the icon of the running man), when tapped, presents a picker list of projects that can be started, along with an entry at the top, "Edit Project List".
To start a project, tap a project from the picker list. The start button will change to the stop button. To add, change or delete projects, select Edit Project List.
The Stop Button
The stop button (the button with the icon of the hand) stops the currently running project, which is displayed along with the time that the project has been running.
Tapping the stop button presents a picker list - this time, however, the choices are either "Edit Project List" or the name of the currently running project. Tapping the name of the project stops that project and changes the stop button back to the start button. Selecting "Edit Project List" allows you to add, change or delete projects.
Editing the Project List
Selecting "Edit Project List" from either the start or stop buttons' menu allows you to add, change or delete the projects that you are using PMS to keep track of. When you select "Edit Project List", the following screen appears:
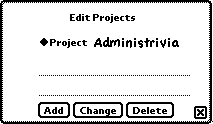
To add a project, write in the name of the project to add, and tap the Add button.
To change a project, select the project to change from the picker, write in the new
project name, and tap the Change button.
To delete a project, select the project to delete from the picker and tap the Delete
button.
The Report Button
The report button gives you access to the functions that let you work with your accumulated data, and to set PMS preferences. Tapping the report button presents a picker list of seven choices:
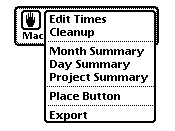
Tapping one of the choices will select it:
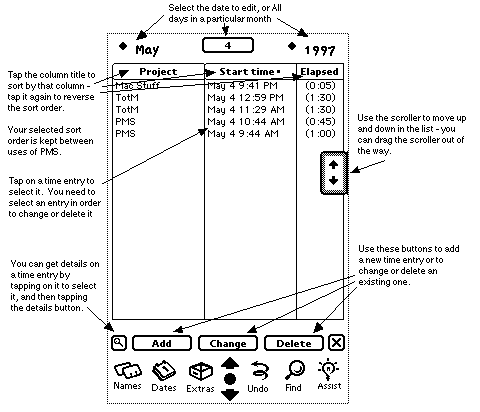
Edit Times
Editing Times allows you to edit individual project entries. A project entry consists of the project name, the time it was started and the time it ended. You can add project entries, change project entries and delete project entries.
When Edit Times is tapped, this screen appears:
Add
Project Entries Tapping Add brings up the add screen. To add one or more entries:
- Use the project picker to select the proper project.
- Use the calendar to select the proper day.
- Enter a valid start time (specifying AM or PM) and either:
- select an elapsed time from the picker list or write one in, or
- enter an end date/ time.
- Tap "Add" to add the entry as you have specified it. Tap "Add and Increment" to add the entry and prepare for a new entry by adding the elapsed time to the start time.
You may also select multiple days in the calendar in order to add a project entry at the same time, for the same elapsed time on a number of days.
You can exit the add screen without adding any project entries by tapping the close box.
Change
Project Entries Tapping Change brings up the change screen. To change the time entry:
- Use the project picker to change the project.
- Use the calendar to change the day.
- Enter a valid start time (specifying AM or PM) and either:
- select an elapsed time from the picker list or write one in, or
- enter an end date/ time.
- Tap "Change" to cause the entry to be changed.
You can exit without making changes by tapping the close box.
Delete
Tapping Delete will cause the entry to be deleted, after a confirmation dialog.
Cleanup
Use the Cleanup screen to purge your PMS time entries of unwanted or unneeded items. When you select Cleanup, the following screen appears:
There are basically two methods of "cleaning up":
- by removing all time entries in a particular month, or in a particular day or before a particular day
- by removing all time entries that contain less than a certain amount of elapsed time, either in a month, in a day or in throughout all of your PMS data
If you are removing entries for a month or day, you must select that month or day from the calendar at the top of the screen before tapping the appropriate button.
Note that when you are removing based on elapsed time, only time entries with less than that elapsed time are removed - in other words, if you ask to remove all entries with less than 10 minutes of elapsed time, entries that contain exactly 10 minutes will not be removed.Month Summary
Selecting month summary displays a summary of projects on a per- day basis for a particular month. When you tap month summary, a picker of months 6 months before and 6 months after the current month appears. Tapping on the appropriate month brings up the following screen:
All times for each project for the month displayed are totalled and displayed in this screen. Note that a project will be displayed even if it has a total time of zero.
Day Summary
Selecting day summary displays a summary of projects on a per-day basis for a particular month. The current month, by default is displayed when Month Summary is selected.
You can select the appropriate month and year using the pickers at the top of the screen. By default the current month and year are displayed when you first enter the month summary. The first day in the month that contains project entries is displayed.
You can move from day to day within the month using one of two methods:

- The "silk- screened" arrows at the bottom of the Newton screen will move you backwards and forwards within the month. When navigating using the arrow buttons, you will be taken to the first entry in the direction you are moving that contains project entries.
- Writing in a specific day at the top of the screen.
When navigating by writing a day, you will be taken to the first entry between the day that you entered and the end of the month that contains project entries. For example, if you write in 29 at the top of the screen for the 29th day of the month, and there is no project data for the 29th, PMS will look for the next day within that month after the 29th that contains data. So, if there was data on the 31st day of the month, that day would be displayed. If there was no data for any days from the 29th of the month onwards, a notification box would be displayed to tell you so.Project Summary
Selecting project summary displays a summary of projects on a per- project basis. The first project in the list is displayed by default when Project Summary is selected.
You can select the project you want a summary for using the project picker at the top of the screen. Each entry's start time, and duration in hours and minutes is shown. You can use the scroll arrows displayed in the project list window to scroll either forwards or backwards in the list. The scroll arrows cause the list to scroll in increments of 5 projects. A total of all time spent on that project (again, in hours and minutes) is displayed at thebottom of the screen.
Place Button
You can use the Place Button option to place the minimized PMS button anywhere on your Newton screen. This position is maintained relative to the edge of the screen to which it is closest - in other words, near the bottom, near the right, etc. and will tend to remain in a similar position when the Newton screen is rotated.
Export
You can use Export to send your accumlated PMS data for a particular month to your desktop system to be included in a spreadsheet or word processor. The PMS desktop client saves the data in a tab-separated text file, which most spreadsheet programs will import, using the tabs to denote column separations. Consult the manual for your spreadsheet for information concerning importing tab-separated text files.
Exporting takes place between PMS on your Newton, and the PMS client on either your Mac or Windows desktop system. Before beginning the export process, you should have already started the PMS client on your desktop system.On the Newton, selecting Export displays a new screen which allows a connection to be made to the PMS/ Desktop client.
To export, select the month/ year that you want to export, the type of connection (Serial or AppleTalk for Macintosh, Serial with MNP for Windows) and tap Connect.
On the PMS client, select either "Import Data" or "Import Raw Data" from the File menu and select the communications port to which your Newton is connected. A status dialog box will appear, containing (at first) the message "Waiting for Newton".
When a connection is made, progress will be displayed as each project entry is imported. If you are performing a raw import, you will be asked to select a file name before transport begins. If you are using normal import, you will be asked to select a save file name when the import opera-tion is complete.
Once the import operation is complete and the file saved, you are ready to import it into your favorite spreadsheet or word processor (or whatever you want to use to manipulate or print the data).
Data imported using "Import Data" as opposed to "Import Raw Data" is placed on the desktop machine in a summarized "timesheet" style format. Data imported using "Import Raw Data" is placed on the desktop in a simple list type format, where all project entries are listed.
Note that the Disconnect button can be used in a situation where the desktop client has disconnected for some reason without terminating the import operation, to close down the connection on the Newton side.
The Minimize Button
Tapping the minimize button "minimizes" PMS, and places the minimized icon at the top centre of the screen. The minimized button may be dragged around the screen in order not to interfere with other applications, or it may be placed in a new position using the Place Button option from the Reports menu.
Note: When minimized, PMS continues to occupy Newton heap - if you are running out of memory in other applications when PMS is minimized, you should exit PMS.
When a project has not been started, the minimized PMS consists only of the start button. When a project has been started, the minimized PMS consists of only the stop button. When minimized, the start and stop buttons behave in the same manner as when PMS is full size, except that "Edit Projects" becomes "Maximize". Selecting Maximize returns PMS to its normal full size view.
The Info Button
Tapping the Info button brings up the PMS Info page. From here, you can check the version of PMS that you are using, enter your registration code, or invoke the Register program (if you haven't already registered).
Notes on Exporting Data
Data is exported to a desktop "client" - either a Macintosh or Windows system running the appropri-ate PMS client. The data saved by the PMS client in tabular or "timesheet" form in a text file. Each column in the table is tab separated to allow for easy import into your favorite spreadsheet program. Please note that in order to be able to import your data into a spreadsheet program, the spreadsheet must be able to support opening of text documents consisting of tab- separated columns.
Projects that do not contain any entries for the month being exported do not show up in
the text file written by the PMS client.
Data is presented in hours and fractions of hours; for example 90 min-utes becomes 1.5
hours, 66 minutes becomes 1.1 hours. Times are rounded to the nearest 1/ 10 of an hour.
When importing into a spreadsheet, note that totals are simply numeric quantities - in other words, they're not formulas so if you modify any of the project time counts in the table by hand, the totals won't be updated.
Macintosh Desktop
The PMS client for Macintosh was tested using ClarisWorks version 3.0 to import the data on a 68040 Macintosh. The PMS Mac client is not Power Macintosh native.
Windows Desktop
The PMS client for Windows was tested using Microsoft Excel version 7.0 to import the data. The PMS Windows client is a 16- bit application and was tested under Windows 95.
Other Notes
Screen shots contained in this document are of PMS operating on a MessagePad running Newton 2.0 - there may be slight differences on MessagePads running Newton 1.3.
Disclaimer and License
Personal Minutes Supervisor and this documentation are all Copyright ©1996 by Wendy Stevenson. All rights reserved. Apple and Newton are trademarks of Apple Computer, Inc., registered in the United States and other countries. NewtonMail and MessagePad are trademarks of Apple Computer, Inc.
Microsoft and Windows are either registered trademarks or trademarks of Microsoft Corporation in the United States and other countries.
1. License. The application, demonstration, system and other software accompanying this License, whether on disk, in read only memory, or by any other media (the "Software"), the related documen-tation and fonts are licensed to you by Wendy Stevenson. You own the media on which the Software and fonts are recorded but Wendy Stevenson and/ or Wendy Stevenson's Licensor( s) retain title to the Software, related documentation and fonts. This License allows you to use the Software and fonts on a single Newton Product (which, for the purposes of this License, shall mean a product bearing Apple's Newton logo), and make one copy of the Software and fonts in machine- readable form for backup purposes only. You must reproduce on such copy Wendy Stevensons's copyright notice and any other proprietary legends that were on the original copy of the Software and fonts. You may also transfer all your license rights in the Software and fonts, the backup copy of the Software and fonts, the related documentation and a copy of this License to another party, provided the other party reads and agrees to accept the terms and conditions of this License.
2. Restrictions. The Software contains copyrighted material, trade secrets and other proprietary material and in order to protect them you may not decompile, reverse engineer, disassemble or otherwise reduce the Software to a human- perceivable form. You may not modify, network, rent, lease, loan, distribute or create derivative works based upon the Software in whole or in part. You may distribute for a nominal download or duplication charge the unregistered Shareware version of Personal Minutes Supervisor as long as it is accompanied by this documentation.
3. Termination. This License is effective until terminated. You may terminate this License at any time by destroying the Software and related documentation and fonts. This License will terminate immediately without notice from Wendy Stevenson if you fail to comply with any provision of this License. Upon termination you must destroy the Software, related documentation and fonts.
4. Export Law Assurances. You agree and certify that neither the Software nor any other
technical data received from Wendy Stevenson, nor the direct product thereof, will be
exported outside the United States except as authorized and as permitted by the laws and
regulations of the United States. If the software has been rightfully obtained by you
outside of the United States, you agree that you will not re- export the Software nor any
other technical data received from Wendy Stevenson, nor the direct product thereof, except
as permitted by the laws and regulations of the United States and the laws and regulations
of the jurisdiction in which you obtained the Software.
5. Government End Users. If you are acquiring the Software and fonts on behalf of any unit
or agency of the United States Government, the following provisions apply. The Government
agrees: (i) if the Software and fonts are supplied to the Department of Defense (DoD), the
Software and fonts are classified as "Commercial Computer Software" and the
Government is acquiring only "restricted rights" in the Software, its
documentation and fonts as that term is defined in Clause 252.227- 7013( c)( 1) of the
DFARS; and (ii) if the software and fonts are supplied to any unit or agency of the United
States Government other than the DoD, the Government's rights in the Software, its
documentation and fonts will be as defined in Clause 52.227- 19( c)( 2) of the FAR or, in
the case of NASA, in Clause 18- 52.227- 86( d) of the NASA Supplement to the FAR.
6. Disclaimer of Warranty on Software. You expressly acknowledge and agree that use of the Soft-ware and fonts is at your sole risk. The Software, related documentation and fonts are provided "AS IS" and without warranty of any kind and Wendy Stevenson and Wendy Stevenson's Licensor( s) (for the purposes of provisions 6 and 7, Wendy Stevenson and Wendy Stevenson's Licensor( s) shall be collectively referred to as "Wendy Stevenson") EXPRESSLY DISCLAIM ALL WARRANTIES, EXPRESS OR IMPLIED, INCLUDING, BUT NOT LIMITED TO, THE IMPLIED WARRANTIES OF MERCHANTABILITY AND FITNESS FOR A PARTICULAR PURPOSE. WENDY STEVENSON DOES NOT WARRANT THAT THE FUNCTIONS CONTAINED IN THE SOFT-WARE WILL MEET YOUR REQUIREMENTS, OR THAT THE OPERATION OF THE SOFT-WARE WILL BE UNINTERRUPTED OR ERROR- FREE, OR THAT DEFECTS IN THE SOFT-WARE AND THE FONTS WILL BE CORRECTED. FURTHERMORE, WENDY STEVENSON DOES NOT WARRANT OR MAKE ANY REPRESENTATIONS REGARDING THE USE OR THE RESULTS OF THE USE OF THE SOFTWARE AND FONTS OR RELATED DOCUMEN-TATION IN TERMS OF THEIR CORRECTNESS, ACCURACY, RELIABILITY, OR OTHER-WISE. NO ORAL OR WRITTEN INFORMATION OR ADVICE GIVEN BY WENDY STEVENSON OR AN AUTHORIZED REPRESENTATIVE OF WENDY STEVENSON SHALL CREATE A WARRANTY OR IN ANY WAY INCREASE THE SCOPE OF THIS WARRANTY. SHOULD THE SOFTWARE PROVE DEFECTIVE, YOU (AND NOT WENDY STEVENSON OR AN AUTHORIZED REPRESENTATIVE OF WENDY STEVENSON) ASSUME THE ENTIRE COST OF ALL NECESSARY SERVICING, REPAIR OR CORRECTION. SOME JURISDIC-TIONS DO NOT ALLOW THE EXCLUSION IF IMPLIED WARRANTIES, SO THE ABOVE EXCLUSION MAY NOT APPLY TO YOU.
7. Limitation of liability. UNDER NO CIRCUMSTANCES INCLUDING NEGLIGENCE, SHALL WENDY
STEVENSON BE LIABLE FOR ANY INCIDENTAL, SPECIAL OR CONSEQUEN-TIAL DAMAGES THAT RESULT FROM
THE USE OR INABILITY TO USE THE SOFTWARE OR RELATED DOCUMENTATION, EVEN IF WENDY STEVENSON
OR AN AUTHORIZED REPRESENTATIVE OF WENDY STEVENSON HAS BEEN ADVISED OF THE POSSIBILITY OF
SUCH DAMAGES. SOME JURISDICTIONS DO NOT ALLOW THE LIMITATION OR EXCLUSION OF LIABILITY FOR
INCIDENTAL OR CONSEQUENTIAL DAMAGES SO THE ABOVE LIMITATION OR EXCLUSION MAY NOT APPLY TO
YOU. In no event shall Wendy Stevenson's total liability to you for all damages, losses,
and causes of action (whether in contract, tort (including negligence) or otherwise)
exceed the amount paid by you for the Software and fonts.
8. Controlling Law and Severability. This License shall be governed by and construed in
accordance with the laws of the United States and the State of California, as applied to
agreements entered into and to be performed entirely within California between California
residents. If for any reason a court of competent jurisdiction finds any provision of this
License, or portion thereof, to be unenforceable, that provision of the License shall be
enforced to the maximum extent permissible so as to effect the intent of the parties, and
the remainder of this License shall continue in full force and effect.
9. Complete Agreement. This License constitutes the entire agreement between the parties with respect to the use of the Software, related documentation and fonts, and supersedes all prior or conterporaneous understandings or agreements, written or oral, regarding such subject matter. No amendment to or modification of this License will be binding unless in writing and signed by a duly authorized representative of Wendy Stevenson.